Showing posts with label recipe. Show all posts

Tuesday, February 25, 2014

{CHICKEN} It's what's for dinner! How to cook a perfect roasted chicken.

I love a perfectly roasted chicken. And in the dead of winter with snow and ice and wind chill, it tastes even better. I am longing for the days that we can throw some chicken on the grill...until then a roasted chicken will do just fine. 
Let's cut right to the chase. This is my recipe for awesome roasted chicken. It is perfect for cooks of all skill levels-as long as you can read. The best part, is that your house will smell amazing while its cooking, and it comes out looking so amazing, YOU will look like a rock star chef. Happy roasting!


Awesome Roasted Chicken   
Cook time: Approximately 1.5-2 hours
Preheat oven: 425 degrees                                                                                        

Ingredients:
1 or 2 roaster chickens (I like to buy the best quality chickens I can find-ideally on sale, and stock up-a good recipe starts with good ingredients)
chicken broth (if you don't have any, water can be substituted)
A piece of twine or string.
(For butter rub)
1 stick butter
2 tsp thyme
2 tsp rosemary
3 tsp garlic powder
2 tsp onion powder
1 tsp paprika
2-3 tsp salt
1-2 tsp pepper
(to stuff in chicken)
1 lemon
1 small onion
1 head of garlic

Cooking Instructions:
*To start, if you are using 2 chickens, you can simply split the ingredients across the 2 birds, you don't need to double the recipe unless you are using huge chickens! However, most roaster chickens are not that big. I like to make 2, so that we can eat one, and have one for left overs. 

1. Remove the giblet bag-if there is one in your chicken. Pat dry. This will help the rub to stick to the bird. So don't leave it wet with chicken juices or moisture.
2. Preheat oven to 425 degrees, and place bird in roasting pan with sides. 
3. Soften 1 stick of butter, until just soft. Do not melt all the way. Add all the of the spices (for butter rub) into the bowl of butter and mix together with a spoon until blended. Set aside.
*You may substitute half a cup of coconut oil melted for the butter-to make the rub, or just drizzle olive oil onto the chicken and add the spices as a dry rub, if you cannot have butter for dietary or allergy reasons.
4.  Slice the lemon and onion in half (peel outer layer of onion off). Slice garlic bulb in half horizontally-do not peel. Stuff the lemon, onion, and garlic into the chicken(s). Tie drum sticks together with twine/string. Tuck the wings under.
5. Rub down chickens with buttered herb mixture. I like to wear a plastic bag on my hand, because who really wants to touch chicken? Once your chicken is fully buttered up, sprinkle a little more salt and pepper over the top, and add 1/4c-1/2c chicken broth (or water if you have none). 
6. Roast your chicken in the middle of the oven uncovered for 40 minutes at 425 degrees F. Then turn the oven down to 375 degrees F. Cook for approximately another hour. Check to see if your chicken is done. The juices should run clear, there should be no pink inside, and the internal temp should be at 165 degrees if you are using a meat thermometer. If you feel your chicken needs more time, give it another 20 minutes. This might be necessary if you are cooking more than one chicken at a time. (A general rule of thumb for cooking a whole chicken, that is defrosted, is 20 minutes of cooking per pound.) 

7. When the chicken is done, transfer it to a cutting board or large platter, and let it set 15 minutes before cutting. 
8. Eat up! 


Monday, January 16, 2012

Balsamic Glazed Chicken. A Fuller Favorite


In our house we LOVE balsamic vinegar. We probably go through more bottles in one season than some people will use in a lifetime. We love it in dressings, marinades, glazes, even desserts. Right now the "balsamic glazed chicken" makes an appearance at least once a week. This is a recipe I have adapted from Jessica Seinfeild's Double Delicious. You can really add whatever sides you want to this tasty skillet chicken. We usually do some sort of potato (baked, potato pancakes), pasta, or salad. You can even put it on top of a salad with a nice vinaigrette or on a sandwich, as Jessica's recipe calls for. 

This is one of those recipes that truly is simple and you can make with very few ingredients you can have on hand in the pantry. The sweet and tangy flavor of the chicken is also very kid friendly.

Balsamic Glazed Chicken
Recipe adapted from Jessica Seinfield's "Balsamic Chicken Sandwich" in her cookbook, Double Delicious

Ingredients:
1-2 lbs boneless skinless chicken. Cut into pieces. I usually do about 3 pieces
1/4 to 1/2 tsp pepper
1/4 to 1/2 tsp salt
1/4 to 1/2 tsp garlic powder and onion powder (optional)
A few tablespoons butter or olive oil to saute the chicken in, in the skillet
5 tablespoons brown sugar
1 cup chicken stock/broth
1/2 cup balsamic vinegar

Directions:
1. Put oil or butter in a warm skillet, heat at medium heat for 2 mins then add chicken. Add salt, pepper, and optional garlic and onion powder. Cook chicken on medium heat until cooked through and not pink inside (about 8-10 mins).
2. Add to the skillet the chicken broth, brown sugar, and balsamic vinegar and stir. Bring to a boil, then reduce heat to low/simmering temp. It will appear very liquidy at first. Let cook in the skillet stirring on occasion until the liquid mixture has reduced  down to a syrupy liquid (about 15-20 mins). Turn off heat and let cool slightly and serve with a side or even on top of rice or a salad. Eat any leftovers the next day on a sandwich. 

Friday, January 13, 2012

The X-Waitress Chicken tortilla soup


Don't get too excited, but I am sharing an original recipe. I have had a number of people ask me for the recipe for this soup and I have never actually shared it (they probably think I'm holding out), because I never had it written down, and never made it the same way twice! But the last time I made it, I paid attention and here you have it.

The X-Waitress Chicken tortilla soup
(makes about 8 servings-excellent leftovers!)

(So a little clarification. I was a waitress, I'm sorry, "server," at Chilis for almost 7 years in high school and college. My favorite soup was the chicken enchilada soup and so here is my tribute to that soup!)

You Need:
  • 3 chicken breasts cooked and cut into pieces (you can do the chicken in the skillet or the grill, seasoning it lightly with some of the seasonings you will use in the soup. You can even do the chicken the day before, or make extra chicken when you are doing another meal and cut it up for this soup and set it aside).
  • 2 small onions
  • 2 3/4 c tomato puree (canned) You can buy one large can and use about 2/3 of it.
  • 1/4 c vegetable oil
  • 3 c chicken broth (or 3 c water with 3 chicken bullion cubes)
  • 12 oz velveta cheese (I get the big block)-You can substitute some other cheese if velveta offends you. This is the only recipe I use it in. Another cheese would just change the consistency. 
  • 1 cup of corn (frozen, canned, or 1 to 2 ears of fresh corn)
  • 1 Tbsp chili powder
  • 2 Tbsp cumin
  • 2 tsp garlic powder
  • 1 tsp salt
  • 3/4 c mixed cheese shredded (I get a mexican blend)
  • 6 white corn tortilla shells and a few Tbsp of vegetable oil (or use tortilla chips)
  • Sour cream (optional for topping)
Put that apron on, here we go!
  1. Dice onions (I usually do mine in the food processor because I don't like chunks).
  2. In a large pot, heat oil and saute onions. Add chili powder, garlic, salt and 1 Tbsp cumin.
  3. After a few mins add in the tomato puree. If you want a heavier tomato taste, you can add more. Stir and let simmer a couple mins.
  4. Add the chicken broth. Let simmer a couple mins.
  5. Cut the Velveeta cheese Whisk in the Velveeta cheese. Until it is melted completely. Now whisk in the shredded cheese. Add the rest of the cumin.
  6. Add in the corn and chicken and stir.
  7. Taste it! If you want a thicker soup, add some more cheese. If you want a spicier soup, add a dash of hot sauce or some cayenne powder. If you want a smokier taste, add some more cumin. You are the boss!
  8. For tortilla strips: Fill about a 1/4-1/2 in of oil in a sauce pan. Heat the oil. Cut the tortillas into strips and place in hot oil until hard or slightly browned. Remove to some paper towel. Sprinkle with salt.
  9. I like to put a dab of sour cream on top of the soup and sprinkle the tortilla strips on top. If you really want to get fancy, put some sour cream in a ziplock bag. Snip the tip of one of the corners, and drizzle the sour cream onto the soup (the the domestic entertainer mama).
  10. Pair it will some yummy corn bread or french bread for added comfort.
*Optional: You could add in some black beans in place of chicken for those vegetarians or add some chopped tomatoes, peppers, and chiles. I am just not into chunks and like the cheesiness of the soup which is why I make it the way I do!

Here's how I store my extra "tort strips" as we called them in the Chilis days. In a plastic bag with some paper towel.


(I previously posted this recipe on my mostly abandoned other blog "Modern Domestic Mama."

Wednesday, January 11, 2012

A cookie a day keeps the doctor away...

These cookies are a triple threat. Don't worry, no one will get hurt, unless you eat all the cookies. Then you might have a problem. These cookies are chewy on the inside with just the right amount of tiny crunch on the edges. Born out of my love for cookies in general, these little babies unite 3 nations: Chocolate chip, Peanut Butter, and Toffee. All the ingredients get along well together, no one stands out too much. So if you are in the mood to try a new tasty treat, here's your girl.


Chewy Toffee Chocolate Chip Peanut butter Triple Cookies Recipe:
(2 dozen)


You will need:
1 stick of room temp butter
1/4 cup peanut butter (1st threat)
1/2 cup brown sugar
1/2 cup granulated sugar
1 egg (room temp you can always put it in a warm cup of water in the shell of course!)
1 teaspoon vanilla
1 1/4 cups flour
1 teaspoon salt
1 teaspoon baking soda
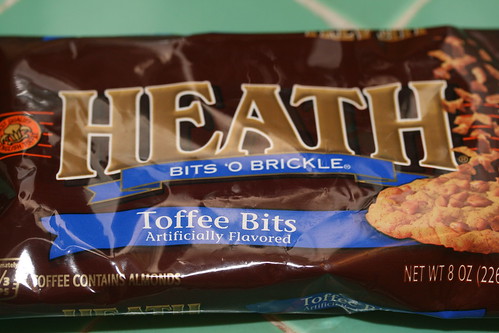
1/2 cup toffee bits (you can find in baking aisle by chocolate chips) (2nd threat)
1 cup semisweet chocolate chips (triple threat!)


Steps:
1. Preheat oven to 350 degrees.
2. Cream together butter, peanut butter, and sugars and mix for a few minutes. Add vanilla until mixed in, then egg until nicely incorporated.
3. Mix together dry ingredients: flour, salt, baking soda. Now slowly add dry ingredients to wet ingredients and mix well. Add the toffee bits and chocolate chips.
4. Drop tablespoon fulls of cookie dough onto your cookie sheet spaced out. If you have trouble with sticking try parchment paper. Bake about 8-11 mins. Cookies will be slightly turning light golden on the outside edges and cracking throughout the tops when they are done. They may seem a bit undone in the middle, but once they set for a couple mins to cool, they will be ready. Transfer cookies to wax paper of mat to cool.
5. Eat!


Saturday, January 7, 2012

How to make the BEST rolls you've ever made: Cinnamon Rolls with Cream Cheese Frosting


Cinnamon Rolls with Cream Cheese Frosting 

There's nothing like a bad cinnamon roll. Actually, there is nothing like a good cinnamon roll topped with bad frosting. Just so we are clear here, let's get all the crimes against a cinnamon roll out on the table:
  1. A roll that tastes like you are eating a pile of cinnamon with some roll on top.
  2. A bad glaze.
  3. Dry rolls.
  4. Overcooked edges and undercooked centers.
  5. A monstrous pile of cinnamon in the center. Bad.
  6. Burnt bottoms!
Now that we have the "What not to do" list covered, lets move on to the cinnamon roll that will change your life, or should I say the cinnamon roll FROSTING that will change your life. I consider myself somewhat of a "connoisseur" of breakfast foods. I love a good brunch and truly have an appreciation for that amazing breakfast buffet you encounter at least once in your life. And lets give a round of applause for eggs. So much potential, versatility, a great contribution.

My point is that when I tell you, "Make this frosting," I would never steer you wrong. I believe very strongly in the code of food ethics: 

THE CINNAMON ROLL
You Need:
  • 1 Pillsbury Hot Roll Mix (I use this or make a recipe for dough in my bread machine. If you have some secret family roll recipe to use, more power to you! But I do love the speed of the Pillsbury Rolls Mix, it only requires 30 mins to rise. You will follow the directions on the box and will need an egg and some water.
  • OR if you have a bread machine you can use the recipe at the bottom of this post. Keep in mind for the bread machine, the ingredients go into the machine in the exact order listed.
  • 1 1/2 c brown sugar
  • 2-3 TBSP cinnamon
  • 2 sticks of butter softened-not melted (not margarine, not pretend butter. REAL BUTTER)
  • 4 oz cream cheese softened (Philly all the way)
  • 1 3/4c to 2 c of powdered sugar (Start with 1 3/4 c and if you want it sweeter, add some more sugar!)
  • 1 1/2 TBSP Vanilla
Instructions:
  1. To make frosting, Mix on high speed cream cheese and ONE STICK of butter for a good 10 mins. Yes 10. If you have a hand mixer, plan your day while you are mixing, if you have a standing mixer like a Kitchen Aid, you are probably smiling. The mixture should be very light and fluffy, and lighter in color. (But if you aren't in the mood to stand there for 10 mins, we can compromise at 5mins and call it a day and still have a decent frosting! It will still be fluffy, just not ultra, ultra fluffy.)
  2. Add powdered sugar and mix until well blended.
  3. Slowly add the vanilla and blend for a minute.
  4. Done! Put directly on rolls or keep refrigerated.
  5. For rolls: Follow instructions on the roll mix. Try to roll the dough into a rectangle. Once you have rolled out your dough, spread the other one stick of butter on top. Mix brown sugar and cinnamon. Sprinkle mixture on top of dough. You can always add more cinnamon, but you can't take it away! You can also add more brown sugar for extrastickiness!
  6. Starting at the end closest to you, roll the dough away from you into a roll. Pinch the outer edge to itself to seal the roll.
  7. Now cut the rolls, about an inch thick. Lay them on a greased pan with a little space in between. Let rise according to the box instructions and bake.
  8. Top warm rolls with yummy frosting and eat!
Helpful tip: Sometimes I will bake the rolls the night before I want to have them, and then just warm them in the oven and top with frosting the next day!

This is another one of those recipes that will increase your likability. When you make fresh baked cinnamon rolls with "better than cinnabon frosting" for whatever occasion people will "Oooo" and "Awww" And just because the Pillsbury Dough Boy helped with the roll making does not take away from the domesticity. Any dough that has to rise is considered "made from scratch" in my book! So-Make. Eat. Serve. Enjoy. Become known for your cinnamon rolls :-)
----------------------------------------------------------------------------------------------------
Cinnamon roll Dough for bread machine:

Large batch:
Dough:
2/3 cup lowfat milk, room temperature
3 large eggs, room temperature
6 tablespoons unsalted butter, room temperature, cut into small cubes
1/2 cup granulated sugar
1 teaspoon salt
1.5 teaspoon pure vanilla extract
4 cups bread flour
2/3 cup cornstarch
2-1/4 teaspoons yeast, active dry, instant or bread machine (this is how much is in one of the yeast packets from the store)

Medium batch:
Dough:
½ cup lowfat milk, room temperature
2 large eggs, room temperature
4 tablespoons unsalted butter, room temperature, cut into small cubes
1/3 cup granulated sugar
¾ teaspoon salt
1 teaspoon pure vanilla extract
3 cups bread flour
1/3 cup cornstarch
1-3/4 teaspoons yeast, active dry, instant or bread machine

Small batch:
1/3 cup lowfat milk, room temperature
1 large eggs, room temperature
3 tablespoons unsalted butter, room temperature, cut into small cubes
1/4 cup granulated sugar
1/2 teaspoon salt
3/4 teaspoon pure vanilla extract
2 cups bread flour
1/3 cup cornstarch
1-1/8 teaspoons yeast, active dry, instant or bread machine

Brown Sugar Maple Granola (Includes Gluten Free Variation)

After trying a variety of granola recipes and making additions and omissions, we came up with the "Fuller Family Favorite Granola Recipe" This recipe makes easy and awesome granola, not that I'm biased. You can easily add additional ingredients like dried fruit, and nuts, as well as eliminate some of the items you don't like. I have even made a Gluten Free version of this for a friend using Gluten free oats. 

2 summers ago, I made 50 lbs of granola for a friend's sister's wedding. I love a challenge. Ha! I was mixing it with huge spoons in huge bins. I felt like I was making granola for giants or something. 

Fuller Favorite Granola

3 1/2 c oats (works better with regular oats not quick oats)
1/4 c wheat germ (optional)
1/2 c brown sugar
1/2 tsp salt
1 c almonds (sliced, slivered, crushed, whatever)

*You can add other nuts or raisins/dried fruit instead if you want in 1/2 c and 1 cup portions. 

Mix the above ingredients together than add the ingredients below:
1/4 c olive oil
1/4 c maple syrup (you can substitute honey but you might want to reduce brown sugar so its not too sweet unless that's how you like it!)
2-4 tbsp water (more or less if you want it more spread out or more clumpy)


Add wet ingredients to dry ingredients. 

Bake on a sheet pan at 250 degrees for 1 hour to 1.5 hours. Mix granola once or twice while baking. 

*To make a GLUTEN FREE version, use no wheat germ and gluten free oats that can be found at many organic/specialty store, whole foods, and Trader Joes. Also double check the other ingredients, but if you are using quality ingredients the rest should all be naturally gluten free. Note: Some gluten intolerant people still have difficulty with oats even gluten free ones. If you are making this version for someone who eats gluten free or has celiac disease check with them. 

Let cool and eat! Awesome on yogurt with fruit. Keep in a container or bag so it stays crunchy.


Get some cheap poly bags from the dollar store or craft store and give this granola as gifts!